DIY
Showing posts with label DIY. Show all posts

Eclectic modern Office Space

Monday, May 9, 2022

No comments
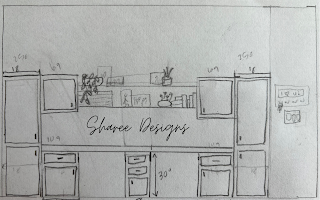
Have you heard?? I’m working on one of my best friends office space in her home! Here’s where i started! Is this how it’s going to end up? Maybe! But I’m sure I’ll tweak some things along the way!

So it’s an office space, right? And while I was researching all the different cabinet options, in order to get to exactly would fit the space, it was going to be…. Pricey. So the options were, get the stock cabs from Home Depot and have them fit the way they fit, or build my own.  So, of course, I did what every good DIYer would do and watched a bunch of YouTube videos on how to build cabinets. And now I’m about halfway done! Have you seen the latest REEL on the ‘gram? We are making progress! Stay tuned to see how it turns out!

Below you will find the mood board and links for the room!


Read More

Easy Coffee table DIY

Thursday, November 14, 2019

No comments
I know what you're thinking.... "Easy, yeah... right...." Well, it's true! AND it won't even take you that long! If you follow along on INSTAGRAM, you know all about my coffee table search! Now, this all came about because I saw a one on Amazon that I liked, but we were already a little over budget on my LOFT REMOD so... I decided to go the slightly less expensive route, and make it! PLUS then I could have the table be the exact size I wanted. So, you want to know how I did it? Lets get started!

NOTE: The measurements can all be adjusted to the size you want your coffee table. Just make sure you adjust all the wood. This table ended up being....


Here is your list of materials you will need...
  • 2, 1x6x8 wood.
  • 2, 1x2x6 wood
  • 1 piece of 5/8 MDF dimensions, 42 1/2 x 21 5/8
  • Chop Saw
  • Hand sander
  • coarse sandpaper
  • fine sandpaper
  • wood glue
  • wood fill
  • Metal table legs
  • Oil Rubbed Bronze metallic spray paint (optional)
  • Nail gun
  • Hammer
  • Screws
  • Wood stain
  • bristle brush
  • lint-free cloths
  • Finishing wax
  • Finishing wax brush
  • Wax cloths
Quick overview.... If you are a veteran at making furniture, then you can read through this and reference the rest of this blog post as needed, otherwise, skip this paragraph. Your 1x6s are going to be the table top, and they will b


e placed, glued and nail gunned on top of the MDF- the MDF will be help stabilize the top. Then the 1x2s will be attached around the whole top, and you'll 45* the corners. You'll then sand the top really well so it's nice and smooth and distress with the hammer, screws, and coarse sandpaper. After than, you can fill the gaps and nail gun holes with wood fill. Let that dry for a while, at least a few hours, and then stain! Allow the stain to dry, and attach legs to the bottom! That's it! Below you will find detailed instructions.


First off, you can order table legs off Amazon! Who would have thought?! Anyway, THESE ARE THE TABLE LEGS I ordered, and you could also use these HAIRPIN LEGS. But I thought they would clash with my rug, and I couldn't have that. ha! When they arrived, I wanted the legs to match my other metal in the Loft, so I spray painted them with Metallic Oil Rubbed Bronze paint.


Grab your 1x6s and cut them to length. Keep in mind that your 1x2s are going to go around ouside of them and cut the 1x6s 1.5" shorter than your final table size. For example... if you want your table to be 44" long, then you will want your 1x6s to be 42.5" long. I wanted our table 4 planks wide, so I cut four 1x6s to 42.5". Line these up nice and tight. 


Next, measure the length and width. Then cut your MDF to that size. (Note: we had extra MDF laying around so we didn't use a sheet of MDF, rather pieces that were cut to the length necessary to line up with the 1x6s. See photos below for reference.)

After your MDF is cut to size, attach the 1x6s to it. (We always use Titebond wood glue.) Apply glue to MDF and then line one 1x6 up on the MDF. Then use the nail gun to secure it in place. Do this with all the 1x6s. Allow glue time to dry. After the glue is dry, use the hand sander and sand the edges of the table to ensure they are nice and smooth. It will make attaching your 1x2s sooooo much easier! Note: You see my lining the MDF up on the 1x6, remember we were using up wood we had in our garage. The instructions are the same either way you do it and your table will end up looking like the one to the right, except the entire bottom of the table will be MDF.


Next, 1x2s! Now these are a little trickier because you are going to cut each corner on a 45* angle. (Now, you don't have to. You can just cut them end to end. and then sand. I just really like the look of the 45ed corners.) Measure the length of each side of the table, that will be the short side of your 1x2, 45* angle cut, or the side that will touch the 1x6, you want those two to line up perfectly so there are not many gaps in between the wood pieces. Measure, cut, and attach one side at a time. It will be easier and likely turn out better if you do it one at a time.


 When you're done, with the 1x2s your table top will look like this!


Now for the fun part! After you have all the 1x2s on, take your sand paper and sand REALLY WELL. Make everything line up as good as possible. Next, it's time to distress! Take your screw and hammer. And hammer the side of the screw onto the wood so the pattern of the screw thread is in the wood. Also, take the backside of the hammer and hit that on the table and then your coarse sand paper and sand, not to make it smooth, but to make scratches in the wood. I like to go against the grain of the wood for this. Do those things as much or as little as you want.


At this point, you can attach the legs to the bottom of the table. OR you can wait until the end, like i did. Either way works! You will turn the table top side down, and then measure where you want the legs. I made them 3.5" from each side. Pre-drill holes into your MDF, and then the screws go into the pre-drilled holes.


Next, fill in the nail gun holes and large gaps between the pieces of wood. Allow your wood fill to dry and when it's dry, take the fine sandpaper and softly sand the places that you filled, then wipe the table clean with lint-free cloth. 


You are now ready to stain! You can choose whatever color you want! If you are using a stain that is new to you, i recommend trying it on a scrap piece of wood to make sure you like it. I used a combination of these two stains. Brush the stain on with a bristle brush and then wiping the excess with a lint-free cloth, you can even use the same one you used to wipe after you sanded! 
Allow stain to dry.


I like to allow stain to dry all night. After it's dry, apply a finishing wax! My favorite is this one made by BBFROSCH. Hands down, I've tried others and this is my FAVE. Also this brush. The best! You'll also want these WAX CLOTHS. Apply the wax with the brush, and wipe off and buff when the wax cloths. Easy as that! If you want to watch a quick video on this technique, CLICK HERE. I suggest doing small 1-2' sections at a time. This wax will dry and harden really fast! One of the reasons I love it!


And then voila! Your table is DONE! Enjoy!!

Happy building and can't wait to see your projects! 
Tag me on INSTAGRAM so I can share your post! 

xoxo, Sharee


Read More

Build a picture ledge shelf- in less than an hour!

Friday, November 1, 2019

1 comment
Ok ok, I know what you are thinking.... Less than an hour, NOT POSSIBLE.

It is totally possible! And you don't even need a saw!! Well, unless you have to cut pieces of wood to size. Then you will need a saw.

So let's get started!


Here is what you will need...
1 1x4 length of wood
1 1x3 length of wood
1 1x2 length of wood
wood glue
stain
plastic gloves
lint-free cloth
nail gun.
hand sander


Your three pieces of wood should all be the length that you want the shelf. For example, I wanted my shelf in my loft 6' long, so all three of my lengths were cut to 6'. Sand those pieces of wood with you hand sander.


Next, put on your plastic gloves and stain the wood! I like to apply the stain with a bristle brush. As you apply, wipe the excess stain off with a lint-free cloth. This is the part that will take the longest.

Let those dry for a minute while you put all the sander, and stain away. 


Keeping your plastic gloves on, take your 1x2 length of wood and put wood glue on the lower half of one of the 2 inch sides. Line that up with a 1" side of the 1x3. Then use your nail gun to secure the two pieces of wood together by nailing it into place. Careful to make sure they line up as you go. It might be a good idea to step on the 1x3 to hold it into place as you nail. Just be careful not to step right where you are nailing.

Next, do the same with the 1x4. Put glue along the bottom of one of the 4 inch sides, and line it up on the other side of the 1x3. Then secure it with the nail gun!

It should look like this at this point! Allow your shelf to fully dry before you put it into place. I like to wait a few hours for this, preferably overnight.

And voila! You're done! Easy Peasy!


This is going on my wall above my couch in my loft that I am doing for the ONE ROOM CHALLENGE. I have LOVED following along with all the other designers! It's been incredible to watch all the transformations!! If you haven't checked it out yet, then you definitely need to click HERE. And make sure you head over to my INSTAGRAM and follow along as I put the final touches on this next week!

See you soon! Happy building!

xoxo, Sharee
Read More

Wallpaper- Everything you need to know for easy installation!

Thursday, October 24, 2019

8 comments
Can I just start out by saying that when I was younger I told myself, I would NEVER have wallpaper in my house... Ever. And now I have it in TWO ROOMS. I also thought I wasn't crafty and couldn't DIY.... And now I am about halfway through redoing our builder grade home. What can I say... I like to eat my words... Moving on...

So you want to install traditional wallpaper huh... It's not as hard or intimidating as you might think! When I found THIS WALLPAPER from Home Depot I fell in LOVE! (And if you're following along with me and the ONE ROOM CHALLENGE on INSTAGRAM you know how many wallpapers I looked at. hahaha!) But I was so intimidated that it wasn't peel and stick that I scoured the internet looking for something similar or that I liked better... Long story short, I kept coming back to the Home Depot one and so I showed Court, who also really liked it, and it was decided. I was going to install non peel-and-stick wallpaper.

I called the most experienced, expert wallpaperer (Hi Mom!) I know and made sure she could come help me install. Because, INTIMIDATION. She told me all the things that I was going to need and I complied it all here for you along with step-by-steps to help you with a great installation! Ready? Here we gooooooo!!!


Your supply list....
120 or less grit sand paper
Wall Size
brush
roller
tape measurer
scissors
bath tub
towels
square
plastic scraper
razor blade
Washcloth
bucket of mildly soapy water
Wallpaper
opt. corner razor- but this makes any corners soooo much easier.


Prep. First things first, you will need to do a little prep... if you have a textured wall, grab your sandpaper and sand the whole wall you're going to wallpaper. Just enough to knock off any sharp points and peaks. Next, and maybe the most important step.... roll THIS WALL SIZE onto your wall as it if were paint. And get in the sides and corners with a paint brush. It won't take you very long and will save you a TON of time and heart ache when you are applying your wallpaper. wall size is important because it will make it so your paper is easy to move around once it's on your wall. Without it your paper will stick to the wall too easily and it will be a nightmare for you to install so don't skip this step!


Measure. Next measure top to bottom of where you will be wallpapering. You're going to want to measure several places around the room to make sure you are going to cut the paper long enough in all the places.


Cut. If you are papering around an entire room, start in the most inconspicuous or easiest end of the room and go from there. You're going to want to start on one end of the room and wrap continually around the room. If you are just doing one wall, start on the corner farthest away from the entrance to the room. This is so the seems will be least visible as you walk into the room. Take your paper and measure it an inch or two longer than the length you will need and make your first cut! Next, line up the next length of wallpaper on the correct side of the paper. Meaning, when that first paper is up, you want to line up the paper on the side that will come next on your wall. Cut any extreme excess off the top, leaving about an inch or two up top and also an inch or two on the bottom. You basically want to leave a little extra on each end just in case any measurements were off. Then, make that cut. Using a pencil, mark a "T" on the back of the top end of your wallpaper.


Book. Fill up your bathtub, or another long basin, with about 4-5 inchces of water. (If you have kids, make sure you clean out the toys from the night before and rinse out your tub so you don't have any soap residue in the water.) Lay out a few towels on the floor. (I laid them in my bathroom so water wouldn't be dripping through my house.)Take one length of wallpaper at a time and roll it up. Submerge it in the water, and then pull it out from one end ensuring that the entire length gets wet. Take the paper and fold both ends to center (hamburger style), careful not to make any creases in the paper! and then fold the new ends together again. (see photos) Let it sit for a couple minutes (This activates the paste!) and then it's time to get it on the wall! 


Application. This is where you will want to keep your level, razor blade, wash cloth, bucket of soapy water (use a mild dish soap), and plastic scraper available. Unfold your first length of wallpaper, find the "T" and then line the top of the paper up to the top of where you are wallpapering. Use your level to make sure your paper is level and use your washcloth to lightly smooth your paper to the wall. Check with the level often to make sure your paper stays level.


Next, use the plastic scraper to smooth out any air bubbles. Do this by angling the scraper on a diagonal and move towards the sides/top/bottom. This will also move the excess glue to the edges of your paper. Take your washcloth and wipe the excess paste away. Make sure you occasionally rinse out your washcloth so that you aren't just wiping paste everywhere. Using your razor blade and slice away the excess paper from the bottom of the first length of wallpaper. And from the top and bottom of each additional paper. You can use a straight edge to help guide the razor along. We started using a metal square to guide the razor, but switched to use the scraper and it worked just as well. Note: make sure you use a new blade. Cutting will be soooo much easier.


Corners. Corners can be tricky. Unless your corner is perfectly square... You will need to measure from the side of your last wallpaper strip to the corner, in a few places. And then measure into the center of the wallpaper from the side that matches up to the side on the wall a little bit bigger than your biggest wall length. For example. If the biggest measurement from the side of the wallpaper to the corner is 9 1/2" then measure on your wallpaper 9 5/8". Then cut that wallpaper to that size so it will fit that space on your wall. The reason you want to cut that wallpaper is to adjust to any imperfections there may be in your wall and corner. Apply it like everything else. Then take the other part of the sheet you cut and make sure that it is level as you apply. If you have to adjust to imperfections in the wall, then it's ok to over lap your wallpaper a little bit. Just make sure it's lined up before you overlap. If you have a corner razor, then you can get your paper on the wall without cutting first and then use the corner razor to cut right in that corner. Then finish and overlap if necessary to keep the paper level.


Repeat as necessary until you are done! 

NOTE: if you have doors and windows that you have to cut around, then just measure, cut, and apply like normal, but cut the large excess that would be in front of the door/window off once its on the wall so that it's easier to get everything nice and tight. Cut any corners on an diagonal to get it around those corners nice and tight. (See Photo) 


And there you have it! Follow these steps and your wallpaper install will be soooo much easier and look so good! I can't wait to see you projects!! Make sure you tag me on INSTAGRAM so I can see and share!

And don't forget to check out the other designers doing the ONE ROOM CHALLENGE!! I love seeing all the progress!!

Happy wallpapering! xoxo, Sharee
Read More

The 5 Best Paint Tips- you're going to want to know!

Thursday, October 17, 2019

No comments
Things are moving right along with the loft project!! Have you been taking my polls and taking a guess at what all my packages are over on my Instagram stories??

It's been so fun following along with so many of the designers for the One Room Challenge!!  Click HERE to go check them out and prepare to go down a creativity rabbit hole!

For me, This week was alllll about paint!! Now, I have painted my fair share of rooms... See, this is how it works at my house.... I design a project, Court and I build it, and then, the rest of the job is mine to finish!

Soooo painting a room... not too hard right? it's just paint?? Well, there are a few things that can help your painting go a little faster and look a little better and I compiled five of my best tips that I have learned over the years here for you! Trail and error is a great teacher, right?! hahah! Learn from my mistakes! My 5 best painting tips for you in 5, 4, 3, 2, 1......


1- Tape and plastic. You're not going to want to get paint on your floor, which if you're me then that will inevitably happen! So, little tip for ya, tape the floor first, and then tape the plastic to that tape. It will stick better and have less lift as you're walking on your plasticed (that's definitely a word) floor. See the photos below for that step by step. Also, I like to double up the plastic layers by not unfolding it all the way. That way, you're less likely to put holes in your plastic.


2. Brushes and rollers. For years, I used the big rollers thinking, it's bigger, I'll get done faster.... Then Court blew all my thoughts and beliefs outta the water, one time, by bringing home a weenie roller. We raced painting a wall one time and, HE WON. That tiny little thing beat my big trusty roller.. So, I gave it a try and I'll never go back. Also, get yourself a nice paint brush. I like the Purdy brand, but you can find several good ones at your hardware store. If you go cheap, your paint won't go on as smooth, AND you'll end up with paint brush bristles on your wall. See the video to the side for size reference. Also, grab one of those weenie roller paint trays.
Now, on to the much anticipated painting part! Yay!! 
Dump your paint into your tray, and let's get started!!

NOTE: Make sure that you are not using too much paint on your brush. It used to be that I would get more paint on my brush to try to make the paint go farther before I had to dip it into paint again, and almost everytime, my paint would run and drip and that is a PAIN IN THE BUTT to fix later. So just trust me on that one.


3. Cutting. Grab your brush and cut (fancy paint word for, well, paint) in your corners and along your floor first! Then smooth it out with your roller. When your painting wall features, such as board and batten, then you'll have a lot more to cut. Be aware of how much paint is getting on the boards, and catch any drips with your brush. It will end up looking similar to the photo on the right when you're done. 


4. Rolling, rolling, rolling. I purposely put too much paint on my roll in this video so you can see how goopy it is when that happens. I also got paint all over me because of paint flinging off my roller, hahaha! (I wouldn't suggest trying that at home!) This is a great time to have your kids help, if you have them! Mine LOVE using the rollers! Just make sure you are aware of any paint drips that may happen while you have helpers.

5. Paint runs and drips. Paint and brushes kind of have a mind of their own when it comes to painting corners and crannies. Keep your eyes peeled for any paint sneaking around corners and lingering in corners leaving runs and drips. If you are painting a wall feature such as board and batten, you have to watch all those boards. Keep your brush handy to catch any drips, and it may be a good idea to paint the boards first then the wall and lightly roll your brush on the boards again after you paint your wall to catch any that you miss. If you do get drip and runs, wait for that coat of paint to dry and then sand it down and paint again.

Repeat as many times as you may need to until your areas covered completely.


And that's it! Enjoy your paint project!! 
And until next time, I'll see you over on the 'gram!

Happy painting! xoxo, Sharee
Read More

Barbie things!

  We are heading to the Barbie movie on Monday and we are all set with our outfits! I really wanted to be able to wear the things we got aga...

Copyright © Sharee Designs. Blog Design by SkyandStars.co